> ## Documentation Index
> Fetch the complete documentation index at: https://rimelabs-docs-coda-websocket-reference.mintlify.site/llms.txt
> Use this file to discover all available pages before exploring further.
# LiveKit Quickstart
> Build a real-time voice agent in your browser using LiveKit Agents + Rime TTS.
This guide uses Rime HTTP. For Coda WebSocket v1, use the TTS configuration in the [LiveKit WebSocket integration](/api-reference/coda/websockets-livekit#use-the-plugin-in-an-agent-session) with the agent setup below.
Build a working browser voice agent with LiveKit transport, OpenAI transcription and responses, and Rime speech. The completed agent handles turn-taking, speech recognition, agent logic, and streaming TTS.
 ## Step 1: Prerequisites
### 1.1 Rime API key
Sign up for a [Rime account](https://app.rime.ai/signup/) and copy your API key from the [API Tokens](https://app.rime.ai/tokens/) page. This enables access to the Rime API for text-to-speech (TTS).
### 1.2 OpenAI API key
Create an [OpenAI account](https://platform.openai.com/signup) and generate an API key from the [API keys page](https://platform.openai.com/api-keys). This key enables speech-to-text (STT) and LLM responses.
### 1.3 LiveKit Cloud
Create a [LiveKit Cloud account](https://cloud.livekit.io/) for real-time audio transport:
1. Create a new project called `rime-agent`
2. Go to **Settings** → **API keys** → **Create key**
3. Copy your **WebSocket URL**, **API key**, and **API secret**. You need all three.
### 1.4 Python
Install [Python 3.10 or later](https://www.python.org/downloads/). Verify your installation by running `python --version` in your terminal.
* A **Room** is a virtual space where participants connect and share media in real time.
* An **Agent** is a server-side participant that processes media streams and interacts with users.
* **LiveKit Cloud** transports real-time audio between participants.
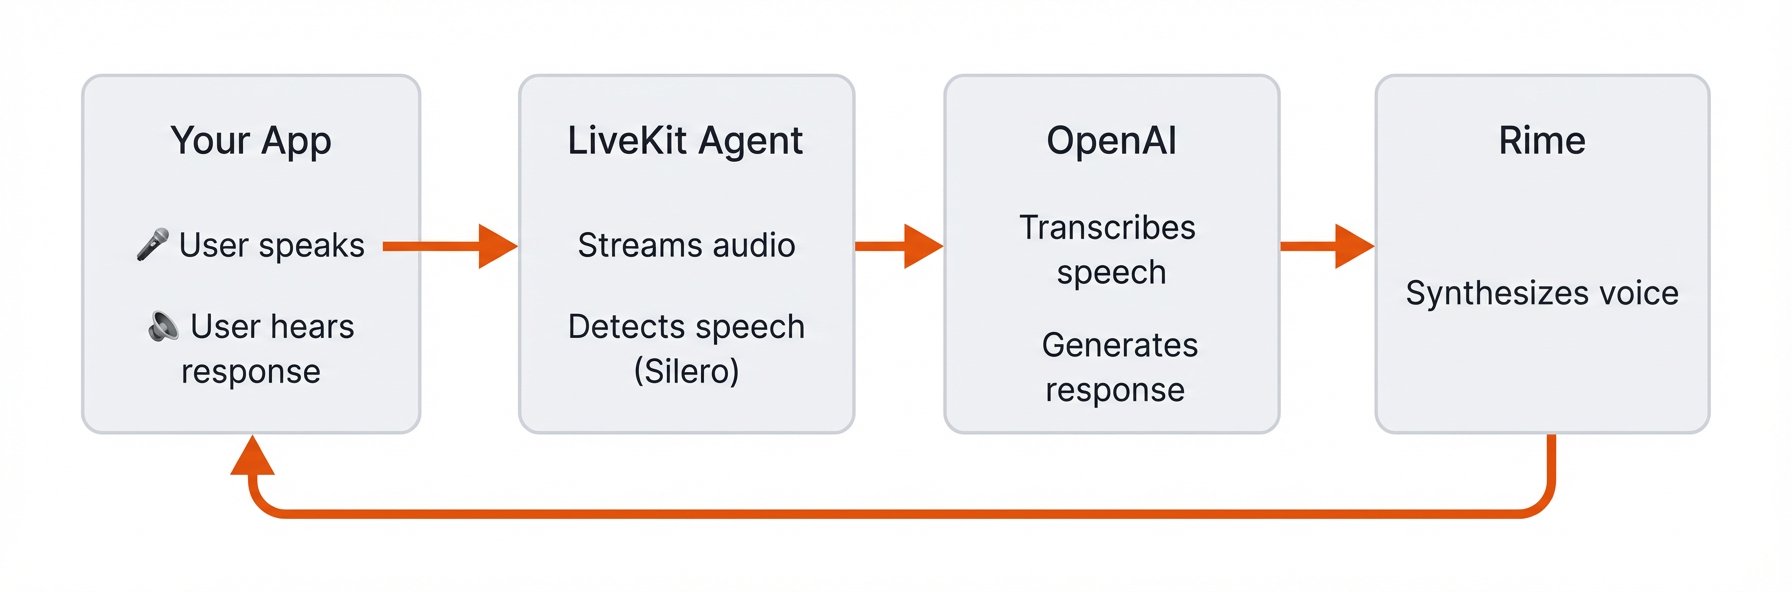
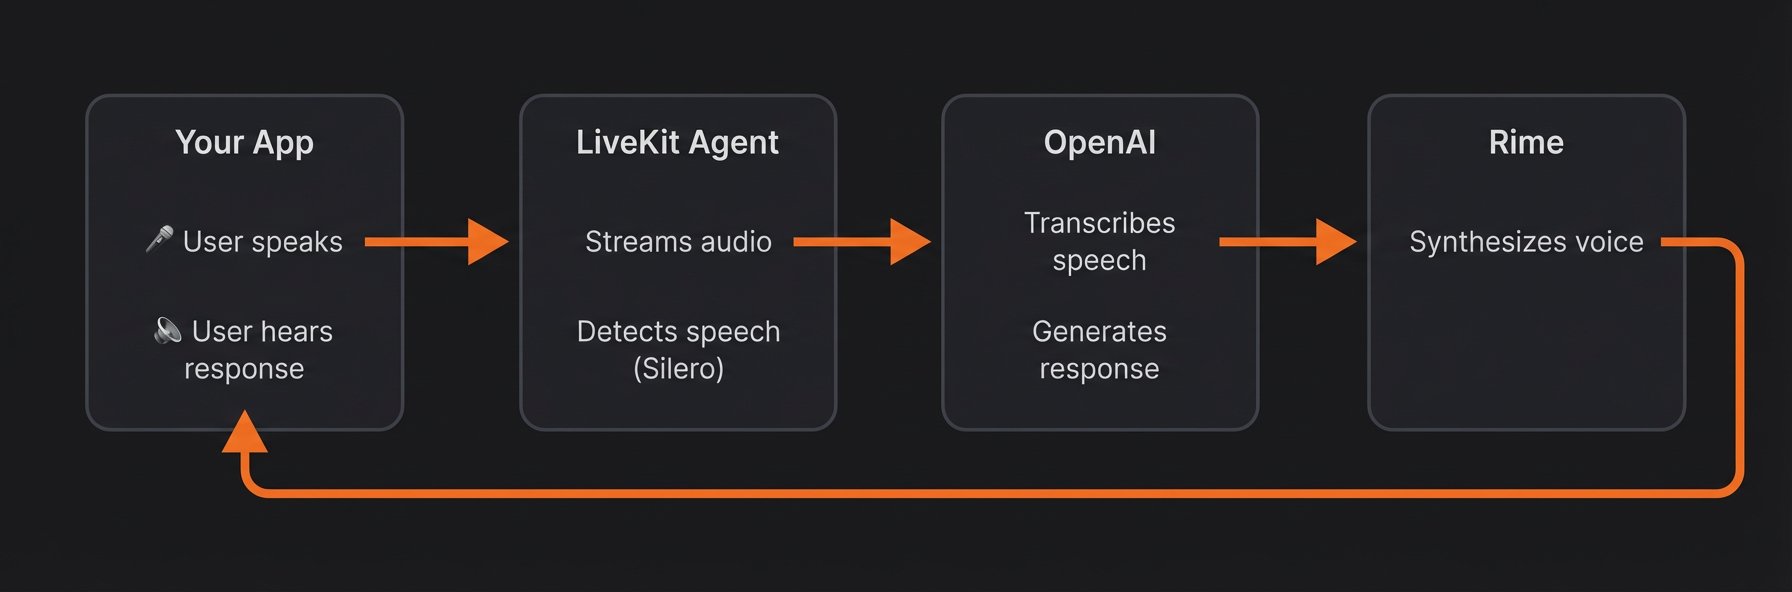
The agent sends user audio through LiveKit to OpenAI for transcription and response generation, then returns Rime speech through the same room:
## Step 1: Prerequisites
### 1.1 Rime API key
Sign up for a [Rime account](https://app.rime.ai/signup/) and copy your API key from the [API Tokens](https://app.rime.ai/tokens/) page. This enables access to the Rime API for text-to-speech (TTS).
### 1.2 OpenAI API key
Create an [OpenAI account](https://platform.openai.com/signup) and generate an API key from the [API keys page](https://platform.openai.com/api-keys). This key enables speech-to-text (STT) and LLM responses.
### 1.3 LiveKit Cloud
Create a [LiveKit Cloud account](https://cloud.livekit.io/) for real-time audio transport:
1. Create a new project called `rime-agent`
2. Go to **Settings** → **API keys** → **Create key**
3. Copy your **WebSocket URL**, **API key**, and **API secret**. You need all three.
### 1.4 Python
Install [Python 3.10 or later](https://www.python.org/downloads/). Verify your installation by running `python --version` in your terminal.
* A **Room** is a virtual space where participants connect and share media in real time.
* An **Agent** is a server-side participant that processes media streams and interacts with users.
* **LiveKit Cloud** transports real-time audio between participants.
The agent sends user audio through LiveKit to OpenAI for transcription and response generation, then returns Rime speech through the same room:
 ## Step 2: Project setup
### 2.1 Create the project folder
Create a new folder for your project and navigate into it:
```bash theme={null}
mkdir rime-voice-agent
cd rime-voice-agent
```
### 2.2 Set up environment variables
In the new directory, create a file called `.env` and add the keys that you created in [Step 1](#step-1%3A-prerequisites):
```
LIVEKIT_URL=wss://your-project.livekit.cloud
LIVEKIT_API_KEY=your_livekit_api_key
LIVEKIT_API_SECRET=your_livekit_api_secret
OPENAI_API_KEY=your_openai_api_key
RIME_API_KEY=your_rime_api_key
```
Replace the placeholder values with your actual API keys and credentials.
### 2.3 Configure dependencies
Create a virtual environment and activate it:
```bash macOS/Linux theme={null}
python -m venv venv
source venv/bin/activate
```
```bash Windows theme={null}
python -m venv venv
venv\Scripts\activate
```
Next, install the `uv` package manager:
```bash theme={null}
pip install uv
```
This helps with LiveKit's complex dependencies.
Create a file called `pyproject.toml` and add the following dependencies:
```toml theme={null}
[project]
name = "rime-voice-agent"
version = "0.1.0"
requires-python = ">=3.10"
dependencies = [
"livekit-agents[openai,rime,silero,turn-detector]>=1.8.2,<2",
"livekit-plugins-noise-cancellation~=0.2",
"python-dotenv>=1.1.1",
]
```
These packages add the following:
* **openai plugin**: Connects to OpenAI for STT and LLM
* **rime plugin**: Connects to Rime for text-to-speech
* **silero plugin**: Voice Activity Detection (knows when you start/stop speaking)
* **turn-detector plugin**: Detects when you've finished your turn in the conversation
* **noise-cancellation plugin**: Filters out background noise
* **python-dotenv**: Loads your API keys from the `.env` file
Then, install the dependencies by running:
```bash theme={null}
uv sync
```
## Step 3: Create the agent
Create a file called `agent.py`. To run the agent without building it up piece by piece, skip to [Step 3.6: Full agent code](#3-6-full-agent-code).
### 3.1 Load environment variables
Add the following imports and initialization code to `agent.py`:
```python theme={null}
from dotenv import load_dotenv
load_dotenv()
```
This loads the API keys from your `.env` file so they're available throughout the application. Don't skip this step: the LiveKit agents CLI doesn't load `.env` files automatically, so without `load_dotenv()` the worker won't find your LiveKit and API credentials.
### 3.2 Define an Agent class
Add the following class definition to `agent.py`:
```python theme={null}
class Assistant(Agent):
def __init__(self):
super().__init__(
instructions="""You are a helpful voice assistant.
Keep your responses short and conversational - no more than 2-3 sentences.
Be friendly and natural."""
)
```
`Assistant` extends the `Agent` base class and sets the agent's personality through a system prompt. [Step 5.2](#5-2-fine-tune-agent-personalities) shows a longer prompt kept in a separate file.
Import the `Agent` class at the top of `agent.py`, along with the rest of the required imports:
```python theme={null}
from dotenv import load_dotenv
from livekit.agents import (
Agent,
AgentSession,
AutoSubscribe,
JobContext,
JobProcess,
RoomInputOptions,
WorkerOptions,
cli,
)
from livekit.plugins import openai, noise_cancellation, rime, silero
from livekit.plugins.turn_detector.multilingual import MultilingualModel
```
These provide access to the LiveKit Agents SDK and the plugins for STT, LLM, TTS, and VAD (voice activity detection).
### 3.3 Code the conversation pipeline
Add the following `entrypoint` function to `agent.py`:
```python theme={null}
async def entrypoint(ctx: JobContext):
await ctx.connect(auto_subscribe=AutoSubscribe.AUDIO_ONLY)
await ctx.wait_for_participant()
session = AgentSession(
stt=openai.STT(model="gpt-4o-transcribe"),
llm=openai.LLM(model="gpt-4o-mini"),
tts=rime.TTS(model="coda", speaker="lyra"),
vad=ctx.proc.userdata["vad"],
turn_detection=MultilingualModel(),
)
await session.start(
room=ctx.room,
agent=Assistant(),
room_input_options=RoomInputOptions(
noise_cancellation=noise_cancellation.BVC()
),
)
await session.say("Hey there! How can I help you today?")
```
Always set `model="coda"` explicitly in `rime.TTS(...)`. Older LiveKit Rime plugin releases default to the retired `arcana` identifier when the model is omitted. See [Remove Arcana model IDs](/docs/migrate-arcana-to-coda) if an existing agent still relies on that default.
Each time a user connects, this function:
* Connects to the LiveKit room and waits for a participant to join
* Creates an `AgentSession` that wires together the voice pipeline components: OpenAI for STT and LLM, Rime for TTS, and LiveKit for VAD and turn detection
* Starts the session with noise cancellation enabled to filter out background noise from the user's microphone
* Greets the user with an initial message
### 3.4 Initialize the VAD plugin
Add the following `prewarm` function below the `entrypoint` function:
```python theme={null}
def prewarm(proc: JobProcess):
proc.userdata["vad"] = silero.VAD.load()
```
This function loads the VAD plugin once when the worker starts, rather than for each new conversation.
### 3.5 Create the main entrypoint
Add the following `__main__` block to `agent.py`:
```python theme={null}
if __name__ == "__main__":
cli.run_app(
WorkerOptions(
entrypoint_fnc=entrypoint,
prewarm_fnc=prewarm,
),
)
```
This starts the agent server that listens for incoming connections from LiveKit. `WorkerOptions` is configured with the two functions you created above: `prewarm_fnc` runs once per worker process to preload models, and `entrypoint_fnc` runs each time a user connects to a room.
### 3.6 Full agent code
At this point, your `agent.py` should look like the complete example below:
```python theme={null}
from dotenv import load_dotenv
from livekit.agents import (
Agent,
AgentSession,
AutoSubscribe,
JobContext,
JobProcess,
RoomInputOptions,
WorkerOptions,
cli,
)
from livekit.plugins import openai, noise_cancellation, rime, silero
from livekit.plugins.turn_detector.multilingual import MultilingualModel
load_dotenv()
class Assistant(Agent):
def __init__(self):
super().__init__(
instructions="""You are a helpful voice assistant.
Keep your responses short and conversational - no more than 2-3 sentences.
Be friendly and natural."""
)
def prewarm(proc: JobProcess):
proc.userdata["vad"] = silero.VAD.load()
async def entrypoint(ctx: JobContext):
await ctx.connect(auto_subscribe=AutoSubscribe.AUDIO_ONLY)
await ctx.wait_for_participant()
session = AgentSession(
stt=openai.STT(model="gpt-4o-transcribe"),
llm=openai.LLM(model="gpt-4o-mini"),
tts=rime.TTS(model="coda", speaker="lyra"),
vad=ctx.proc.userdata["vad"],
turn_detection=MultilingualModel(),
)
await session.start(
room=ctx.room,
agent=Assistant(),
room_input_options=RoomInputOptions(
noise_cancellation=noise_cancellation.BVC()
),
)
await session.say("Hey there! How can I help you today?")
if __name__ == "__main__":
cli.run_app(
WorkerOptions(
entrypoint_fnc=entrypoint,
prewarm_fnc=prewarm,
),
)
```
## Step 4: Test your agent
### 4.1 Start the agent
Start your agent by running:
```bash theme={null}
uv run agent.py dev
```
The `dev` argument starts the agent in development mode. You'll see output like:
```
INFO livekit.agents starting worker {"version": "1.6.5", ...}
INFO livekit.agents initializing process {"pid": 12345, ...}
INFO livekit.agents process initialized
INFO livekit.agents HTTP server listening on :12332
```
### 4.2 Connect to your agent
Open the [LiveKit Agents Playground](https://agents-playground.livekit.io) in your browser.
* Select your project, then select **Use \[project\_name]**.
* At the top right of the Playground, select **Connect**.
* Allow microphone access when prompted.
If everything is set up correctly, you should hear your agent say the greeting that you configured above:
```python theme={null}
await session.say("Hey there! How can I help you today?")
```
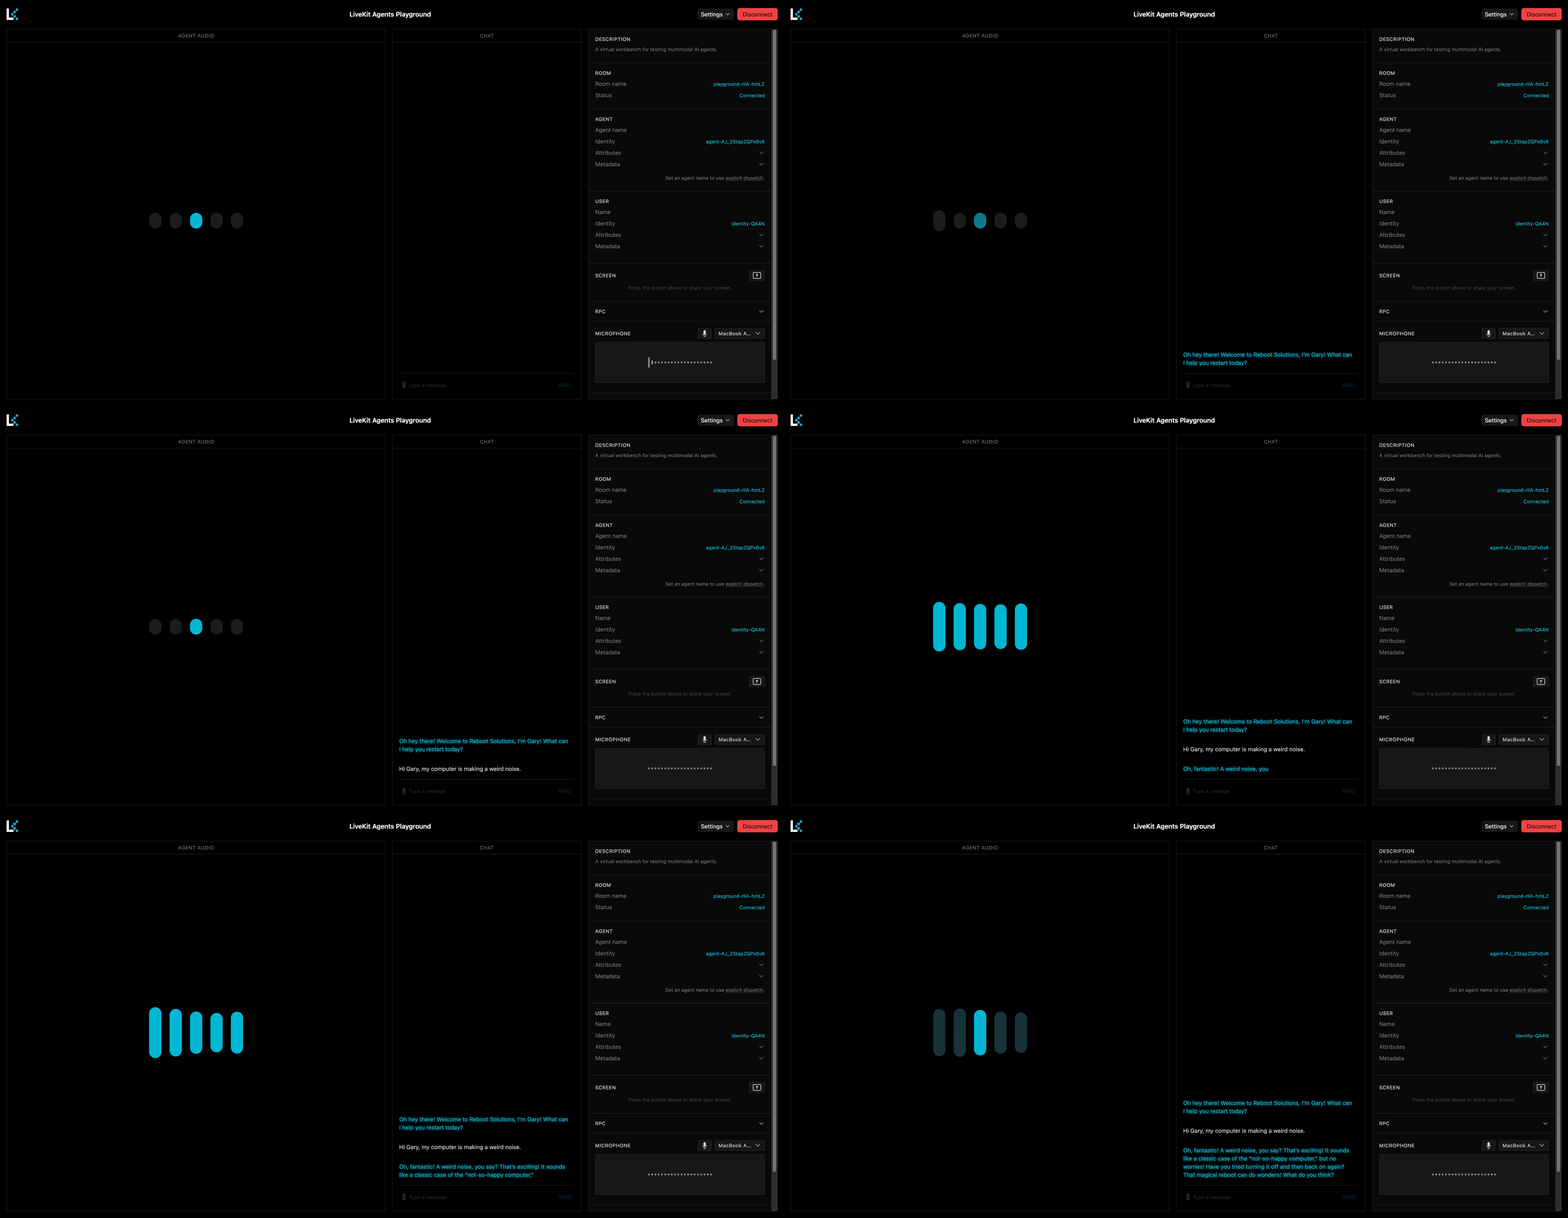
You can now talk to your agent using your microphone or by typing in the chat section.
## Step 5: Customize your agent
### 5.1 Change the voice
Update the `tts` line in your `AgentSession` to try a different voice:
```python theme={null}
tts=rime.TTS(model="coda", speaker="astra"),
```
Rime has many voices. See the full list on the [Voices](/docs/voices) page.
### 5.2 Fine-tune agent personalities
Create a new file called `personality.py` with the following content:
```python theme={null}
SYSTEM_PROMPT = """
CHARACTER:
You are Gary, an overly enthusiastic tech support agent who is convinced
that every problem can be solved by turning it off and on again. You work
for a fictional company called "Reboot Solutions" and take your job very seriously.
PERSONALITY:
- Extremely optimistic, even when things are clearly going wrong
- Obsessed with the power of rebooting
- Uses tech jargon incorrectly but confidently
- Gets genuinely excited when users describe their problems
- Occasionally references "the great outage of 2019" as a formative experience
SPEECH STYLE:
- Keep responses to 2-3 sentences maximum
- Add natural fillers like "um", "well", "you know"
- Express enthusiasm with phrases like "Oh, fantastic!" and "Love it!"
- Always end with a question to keep the conversation going
RESTRICTIONS:
- Never break character
- Don't use emojis or special characters
- Avoid technical accuracy - confidence matters more than correctness
"""
INTRO_MESSAGE = "Oh hey there! Welcome to Reboot Solutions, I'm Gary! What can I help you restart today?"
```
Update your `agent.py` to import and use this prompt:
```python theme={null}
from personality import SYSTEM_PROMPT, INTRO_MESSAGE
class Assistant(Agent):
def __init__(self):
super().__init__(instructions=SYSTEM_PROMPT)
```
Update the greeting at the end of `entrypoint`:
```python theme={null}
await session.say(INTRO_MESSAGE)
```
Keeping the system prompt in a separate file lets you change the character without editing the agent logic.
### 5.3 Adjust TTS chunking
By default, `rime.TTS(...)` uses Rime's HTTP synthesis path. LiveKit wraps non-streaming TTS providers so streamed LLM output can be sent to TTS in sentence-aligned chunks.
If you want to tune those chunks, wrap Rime explicitly:
```python theme={null}
from livekit.agents import tokenize, tts
from livekit.plugins import rime
tts = tts.StreamAdapter(
tts=rime.TTS(model="coda", speaker="wawona"),
sentence_tokenizer=tokenize.blingfire.SentenceTokenizer(
retain_format=True,
min_token_len=250,
max_token_len=500,
),
)
```
Chunking options:
* `min_token_len`: Batches sentences until the chunk reaches this size. Increase it for smoother multi-sentence prosody.
* `max_token_len`: Caps chunk size. Use it to avoid very large TTS requests.
* `retain_format`: Keeps original whitespace and newlines. `True` matches LiveKit's default wrapper behavior.
Tuning chunk size is a prosody/latency tradeoff: larger chunks usually sound better, while smaller chunks usually start faster.
## Troubleshooting
### Agent doesn't respond to speech
* **Check microphone permissions:** Ensure your browser has microphone access enabled.
* **Verify VAD is working:** Look for `speech detected` logs in the terminal. If missing, check your Silero plugin installation.
* **Test with text input:** Use the chat input in the Playground to confirm the agent logic works.
### "Connection refused" or agent won't start
* **Check environment variables:** Ensure all keys in `.env` are set correctly with no extra spaces.
* **Verify LiveKit credentials:** Confirm your `LIVEKIT_URL`, `LIVEKIT_API_KEY`, and `LIVEKIT_API_SECRET` match your LiveKit Cloud project.
### Incorrect voice detection
* **Enable noise cancellation:** Verify `noise_cancellation.BVC()` is included in your `RoomInputOptions`.
* **Check your microphone:** Test with a different input device or headset
* **Reduce background noise:** The VAD may struggle to detect speech in noisy environments.
## Step 2: Project setup
### 2.1 Create the project folder
Create a new folder for your project and navigate into it:
```bash theme={null}
mkdir rime-voice-agent
cd rime-voice-agent
```
### 2.2 Set up environment variables
In the new directory, create a file called `.env` and add the keys that you created in [Step 1](#step-1%3A-prerequisites):
```
LIVEKIT_URL=wss://your-project.livekit.cloud
LIVEKIT_API_KEY=your_livekit_api_key
LIVEKIT_API_SECRET=your_livekit_api_secret
OPENAI_API_KEY=your_openai_api_key
RIME_API_KEY=your_rime_api_key
```
Replace the placeholder values with your actual API keys and credentials.
### 2.3 Configure dependencies
Create a virtual environment and activate it:
```bash macOS/Linux theme={null}
python -m venv venv
source venv/bin/activate
```
```bash Windows theme={null}
python -m venv venv
venv\Scripts\activate
```
Next, install the `uv` package manager:
```bash theme={null}
pip install uv
```
This helps with LiveKit's complex dependencies.
Create a file called `pyproject.toml` and add the following dependencies:
```toml theme={null}
[project]
name = "rime-voice-agent"
version = "0.1.0"
requires-python = ">=3.10"
dependencies = [
"livekit-agents[openai,rime,silero,turn-detector]>=1.8.2,<2",
"livekit-plugins-noise-cancellation~=0.2",
"python-dotenv>=1.1.1",
]
```
These packages add the following:
* **openai plugin**: Connects to OpenAI for STT and LLM
* **rime plugin**: Connects to Rime for text-to-speech
* **silero plugin**: Voice Activity Detection (knows when you start/stop speaking)
* **turn-detector plugin**: Detects when you've finished your turn in the conversation
* **noise-cancellation plugin**: Filters out background noise
* **python-dotenv**: Loads your API keys from the `.env` file
Then, install the dependencies by running:
```bash theme={null}
uv sync
```
## Step 3: Create the agent
Create a file called `agent.py`. To run the agent without building it up piece by piece, skip to [Step 3.6: Full agent code](#3-6-full-agent-code).
### 3.1 Load environment variables
Add the following imports and initialization code to `agent.py`:
```python theme={null}
from dotenv import load_dotenv
load_dotenv()
```
This loads the API keys from your `.env` file so they're available throughout the application. Don't skip this step: the LiveKit agents CLI doesn't load `.env` files automatically, so without `load_dotenv()` the worker won't find your LiveKit and API credentials.
### 3.2 Define an Agent class
Add the following class definition to `agent.py`:
```python theme={null}
class Assistant(Agent):
def __init__(self):
super().__init__(
instructions="""You are a helpful voice assistant.
Keep your responses short and conversational - no more than 2-3 sentences.
Be friendly and natural."""
)
```
`Assistant` extends the `Agent` base class and sets the agent's personality through a system prompt. [Step 5.2](#5-2-fine-tune-agent-personalities) shows a longer prompt kept in a separate file.
Import the `Agent` class at the top of `agent.py`, along with the rest of the required imports:
```python theme={null}
from dotenv import load_dotenv
from livekit.agents import (
Agent,
AgentSession,
AutoSubscribe,
JobContext,
JobProcess,
RoomInputOptions,
WorkerOptions,
cli,
)
from livekit.plugins import openai, noise_cancellation, rime, silero
from livekit.plugins.turn_detector.multilingual import MultilingualModel
```
These provide access to the LiveKit Agents SDK and the plugins for STT, LLM, TTS, and VAD (voice activity detection).
### 3.3 Code the conversation pipeline
Add the following `entrypoint` function to `agent.py`:
```python theme={null}
async def entrypoint(ctx: JobContext):
await ctx.connect(auto_subscribe=AutoSubscribe.AUDIO_ONLY)
await ctx.wait_for_participant()
session = AgentSession(
stt=openai.STT(model="gpt-4o-transcribe"),
llm=openai.LLM(model="gpt-4o-mini"),
tts=rime.TTS(model="coda", speaker="lyra"),
vad=ctx.proc.userdata["vad"],
turn_detection=MultilingualModel(),
)
await session.start(
room=ctx.room,
agent=Assistant(),
room_input_options=RoomInputOptions(
noise_cancellation=noise_cancellation.BVC()
),
)
await session.say("Hey there! How can I help you today?")
```
Always set `model="coda"` explicitly in `rime.TTS(...)`. Older LiveKit Rime plugin releases default to the retired `arcana` identifier when the model is omitted. See [Remove Arcana model IDs](/docs/migrate-arcana-to-coda) if an existing agent still relies on that default.
Each time a user connects, this function:
* Connects to the LiveKit room and waits for a participant to join
* Creates an `AgentSession` that wires together the voice pipeline components: OpenAI for STT and LLM, Rime for TTS, and LiveKit for VAD and turn detection
* Starts the session with noise cancellation enabled to filter out background noise from the user's microphone
* Greets the user with an initial message
### 3.4 Initialize the VAD plugin
Add the following `prewarm` function below the `entrypoint` function:
```python theme={null}
def prewarm(proc: JobProcess):
proc.userdata["vad"] = silero.VAD.load()
```
This function loads the VAD plugin once when the worker starts, rather than for each new conversation.
### 3.5 Create the main entrypoint
Add the following `__main__` block to `agent.py`:
```python theme={null}
if __name__ == "__main__":
cli.run_app(
WorkerOptions(
entrypoint_fnc=entrypoint,
prewarm_fnc=prewarm,
),
)
```
This starts the agent server that listens for incoming connections from LiveKit. `WorkerOptions` is configured with the two functions you created above: `prewarm_fnc` runs once per worker process to preload models, and `entrypoint_fnc` runs each time a user connects to a room.
### 3.6 Full agent code
At this point, your `agent.py` should look like the complete example below:
```python theme={null}
from dotenv import load_dotenv
from livekit.agents import (
Agent,
AgentSession,
AutoSubscribe,
JobContext,
JobProcess,
RoomInputOptions,
WorkerOptions,
cli,
)
from livekit.plugins import openai, noise_cancellation, rime, silero
from livekit.plugins.turn_detector.multilingual import MultilingualModel
load_dotenv()
class Assistant(Agent):
def __init__(self):
super().__init__(
instructions="""You are a helpful voice assistant.
Keep your responses short and conversational - no more than 2-3 sentences.
Be friendly and natural."""
)
def prewarm(proc: JobProcess):
proc.userdata["vad"] = silero.VAD.load()
async def entrypoint(ctx: JobContext):
await ctx.connect(auto_subscribe=AutoSubscribe.AUDIO_ONLY)
await ctx.wait_for_participant()
session = AgentSession(
stt=openai.STT(model="gpt-4o-transcribe"),
llm=openai.LLM(model="gpt-4o-mini"),
tts=rime.TTS(model="coda", speaker="lyra"),
vad=ctx.proc.userdata["vad"],
turn_detection=MultilingualModel(),
)
await session.start(
room=ctx.room,
agent=Assistant(),
room_input_options=RoomInputOptions(
noise_cancellation=noise_cancellation.BVC()
),
)
await session.say("Hey there! How can I help you today?")
if __name__ == "__main__":
cli.run_app(
WorkerOptions(
entrypoint_fnc=entrypoint,
prewarm_fnc=prewarm,
),
)
```
## Step 4: Test your agent
### 4.1 Start the agent
Start your agent by running:
```bash theme={null}
uv run agent.py dev
```
The `dev` argument starts the agent in development mode. You'll see output like:
```
INFO livekit.agents starting worker {"version": "1.6.5", ...}
INFO livekit.agents initializing process {"pid": 12345, ...}
INFO livekit.agents process initialized
INFO livekit.agents HTTP server listening on :12332
```
### 4.2 Connect to your agent
Open the [LiveKit Agents Playground](https://agents-playground.livekit.io) in your browser.
* Select your project, then select **Use \[project\_name]**.
* At the top right of the Playground, select **Connect**.
* Allow microphone access when prompted.
If everything is set up correctly, you should hear your agent say the greeting that you configured above:
```python theme={null}
await session.say("Hey there! How can I help you today?")
```
You can now talk to your agent using your microphone or by typing in the chat section.
## Step 5: Customize your agent
### 5.1 Change the voice
Update the `tts` line in your `AgentSession` to try a different voice:
```python theme={null}
tts=rime.TTS(model="coda", speaker="astra"),
```
Rime has many voices. See the full list on the [Voices](/docs/voices) page.
### 5.2 Fine-tune agent personalities
Create a new file called `personality.py` with the following content:
```python theme={null}
SYSTEM_PROMPT = """
CHARACTER:
You are Gary, an overly enthusiastic tech support agent who is convinced
that every problem can be solved by turning it off and on again. You work
for a fictional company called "Reboot Solutions" and take your job very seriously.
PERSONALITY:
- Extremely optimistic, even when things are clearly going wrong
- Obsessed with the power of rebooting
- Uses tech jargon incorrectly but confidently
- Gets genuinely excited when users describe their problems
- Occasionally references "the great outage of 2019" as a formative experience
SPEECH STYLE:
- Keep responses to 2-3 sentences maximum
- Add natural fillers like "um", "well", "you know"
- Express enthusiasm with phrases like "Oh, fantastic!" and "Love it!"
- Always end with a question to keep the conversation going
RESTRICTIONS:
- Never break character
- Don't use emojis or special characters
- Avoid technical accuracy - confidence matters more than correctness
"""
INTRO_MESSAGE = "Oh hey there! Welcome to Reboot Solutions, I'm Gary! What can I help you restart today?"
```
Update your `agent.py` to import and use this prompt:
```python theme={null}
from personality import SYSTEM_PROMPT, INTRO_MESSAGE
class Assistant(Agent):
def __init__(self):
super().__init__(instructions=SYSTEM_PROMPT)
```
Update the greeting at the end of `entrypoint`:
```python theme={null}
await session.say(INTRO_MESSAGE)
```
Keeping the system prompt in a separate file lets you change the character without editing the agent logic.
### 5.3 Adjust TTS chunking
By default, `rime.TTS(...)` uses Rime's HTTP synthesis path. LiveKit wraps non-streaming TTS providers so streamed LLM output can be sent to TTS in sentence-aligned chunks.
If you want to tune those chunks, wrap Rime explicitly:
```python theme={null}
from livekit.agents import tokenize, tts
from livekit.plugins import rime
tts = tts.StreamAdapter(
tts=rime.TTS(model="coda", speaker="wawona"),
sentence_tokenizer=tokenize.blingfire.SentenceTokenizer(
retain_format=True,
min_token_len=250,
max_token_len=500,
),
)
```
Chunking options:
* `min_token_len`: Batches sentences until the chunk reaches this size. Increase it for smoother multi-sentence prosody.
* `max_token_len`: Caps chunk size. Use it to avoid very large TTS requests.
* `retain_format`: Keeps original whitespace and newlines. `True` matches LiveKit's default wrapper behavior.
Tuning chunk size is a prosody/latency tradeoff: larger chunks usually sound better, while smaller chunks usually start faster.
## Troubleshooting
### Agent doesn't respond to speech
* **Check microphone permissions:** Ensure your browser has microphone access enabled.
* **Verify VAD is working:** Look for `speech detected` logs in the terminal. If missing, check your Silero plugin installation.
* **Test with text input:** Use the chat input in the Playground to confirm the agent logic works.
### "Connection refused" or agent won't start
* **Check environment variables:** Ensure all keys in `.env` are set correctly with no extra spaces.
* **Verify LiveKit credentials:** Confirm your `LIVEKIT_URL`, `LIVEKIT_API_KEY`, and `LIVEKIT_API_SECRET` match your LiveKit Cloud project.
### Incorrect voice detection
* **Enable noise cancellation:** Verify `noise_cancellation.BVC()` is included in your `RoomInputOptions`.
* **Check your microphone:** Test with a different input device or headset
* **Reduce background noise:** The VAD may struggle to detect speech in noisy environments.